Series 1: Soft wood board, 20 x 30 cm, 12 fields
Using an electrical Rotary tool (mini drilling machine) for carving into the wood with a variety of different tool tips
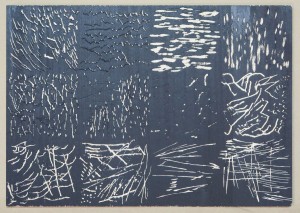 1) Fine round tip did not get into the wood, continued with large round tip which worked better and made vertical short and long lines (with the grain)
2) Same tool, horizontal lines (against the grain)
3) 2 cm ⌀ Metal brush for wider marks horizontally (against the grain)
4) Same tool, vertically (with the grain)
5) Small cylindrical sanding bit
6) Angled cylindrical sanding bit
7) 5mm ball sanding tip
8) 1mm drill
9) same tool
10) same tool
11) 2 cm saw wheel
11) 2 cm saw wheel
Prints on white rice paper (left) and brown Kraft paper (right)


Evaluation
I liked working into the wood surface and felt relatively safe using the Rotary tool. The grip mat under the wood kept it safely in place and I had to use only minimal force, which was quite different from working with lino cutters.
The Rotary tool seems to be best suited to expressive linear marks – cutting away larger areas would have been difficult. Working with the tool creates sawdust, which luckily was rather large and stuck to the plate and did not fly around too much, but probably it’s better to use a dust mask.
The wood surface soaked up a lot of ink, but permitted to print relatively fine detail despite the marks were not very deep. The Rotary tool might come in handy when linear elements or irregular, ragged marks are desired. For future trials, I’d expand to various hand cutting tools.
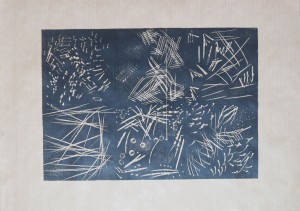
Series 2: Polystyrene board 29 x 43 cm, 12 fields
 1) My fingernails
2) A ball pen
3) The back of a spoon
4) Utility knife
5) A screw
6) Backside of a pen for round, flat impressions
7) Impressions with a Q-Tip
8) Impressions with a nailbrush
9) Incisions with a sharp pottery tool
10) Digging into the surface with a spoon-shaped pottery tool
11) Impressions with a spade-shaped pottery tool (they look like footprints in the snow on the white polystyrene)
12) Scissor cuts
Prints on white rice paper and white drawing paper, approx. A3 size


Evaluation
I did not like at all working with the polystyrene, because it creates such a mess when it is cut. Little white crumbs that seem to stick to every surface and are hard to clean away. Printing the plate did not go well either. The surface absorbed huge amounts of ink and still did not print to a saturated black tone. I don’t think I’m going to continue working with Polystyrene unless the visual effect should be exactly what I’m looking for in a particular project.
Series 3: Thick chipboard, 14 x 30 cm, 8 fields
 1) Incisions with a screw
2) Cutting ridges with an Exacto craft knife (very sharp)
3) digging into the surface with scissors
4) Exacto knife for cuts and flat screwdriver to dig out pieces
5) Rotary tool: Small round metal bit
6) Rotary tool: Large round metal bit
7) Rotary tool: Drill #1 (ca 1mm diameter)
8) Rotary tool: Sanding wheel 2 cm diameter
Prints on white rice paper and brown Kraft paper


Evaluation
The Rotary tool creates a lot of dust when working into the chipboard surface, and it doesn’t get into it very well, so I had to scrape off lots of material away with a craft knife to clean up the marks. Therefore I’d generally prefer to use handcutting tools for cardboard.
The cardboard surface is quite absorbent but still permits well saturated prints. The ragged style of the marks pleases me, too. What I particularly liked was the non-standard format and how it worked with the broad margins on the paper.
The material was thick enough to permit both linear marks and cutting away larger areas in a relief, which makes it quite versatile. But overall, I did not find it overly pleasant to work with, because it needed much physical force to cut into.
Series 4: Foam sheet (2mm), 21 x 30 cm, 6 fields
 1) My fingernails and a ball pen
2) Double tip pottery tool and brush pottery tool
3) Shovel-shaped pottery tool
4) Needlepoint and spade pottery tools
5) Incisions, scratches and impressions made with a screw
6) Impressions made with a dull knife
Evaluation
Using the foam sheet as a surface was a surprisingly positive experience. For one, it was very easy to work into the surface, and secondly, it printed nicely from hand pressure and even went through the press without loosing detail.
The only problem was that my sheet was very thin (2mm) and therefore would not permit to cut away larger areas for a relief, unless mounted on a thicker support.
Prints on rice paper by hand (left) and Kraft paper with a press (right)

Reflections on the first experimental cutting session
I found it quite interesting to work with different materials and tools, other than lino and linocutters. It was good to see how the combination of surface, tools and printing paper worked or not. From this first session, I think I’m going to work again with wood and foam sheets, but will abandon Polystyrene. I’m not sure about cardboard – it’s not bad but I didn’t enjoy working on that surface as much as wood or foam, so will probably leave it as well.
While cutting, I realized that I want to be able to make both linear marks and cut away larger areas, so the chosen combination of tools and surfaces should allow this. I also prefer materials/techniques that do not require too much physical force and do not develop so much dust. So actually lino is already a material that fulfils these requirements to a great extent. Limits of lino appear with fine details – the surface tends to crumble away easily at sharp edges. This is probably done better with wood.
The big surprise was foam, it is so easy to work with and prints nicely. I wouldn’t have expected this and it adds some new possibilities to relief printing.