I continued to experiment with surfaces and mark-making in three more sessions.
Series 4: Soft wood board, 20 x 30 cm, 12 fields
I used the back side of the wood board from Series 1, but with new tools: A set of wood carving knives (fields 1 to 8) and an electric carving tool (Rotary tool) which had more power and a different set of tooltips (fields 9 to 12)
 Woodcarving knives:
1) Round knife #1 (smallest)
2) Round knife #2 and #3
3) Round knife #4
4) Round knife #5
5) Fine needle tip knife
6) 90° V-knife
7) Small and wide straigt chisels (5mm and 8mm)
8) small angled chisel
Rotary tools:
9) Blade saw
10) Triangular burr tip
11) Rounded burr tip
12) Small drill 2mm diameter
It was interesting to use wooden carving tools. I hadn’t tried my linocutting knives with the wood because I believed they were not sharp enough. The woodcutting tools came with a little stone so I could sharpen those that were a bit dull. Cutting with them went ok, although I tended to slide a bit due to the grain of the wood. The material is hard and quite some effort is required to cut away shapes.
By contrast, the electric Rotary tool cut into the wood like butter which eliminated the physical effort. The downside is the dust which normally should require wearing safety glasses and a dusk mask. I tried the mask in addition to the glasses I normally wear, but could hardly breathe, so this was not an option. If I were to use this often, I’d make sure to have a dust mask that is more comfortable.
Printing resulted in clear shapes as I had expected.

Series 5: Clayboard and various tools, 7.5 x 21 cm scrap piece, 5 fields
 1) left: fine scratchboard nib; right: cutter nib
2) line tool
3) left: fiber brush; right: wire brush
4) left: a screw; right: scissors
5) 8 mm woodworking chisel
The clayboard was difficult to work on with the tools that were supposed to scratch into the surface. Actually the marks were so fine that they hardly printed at all. Only the more robust tools from my own toolbox created marks that were deep enough for a noticeable relief effect.
But I liked how the small plate looked on the large paper, the wide landscape format with broad space around it.

Series 6: Scratch-foam and various tools, 21 x 30 cm, 12 fields
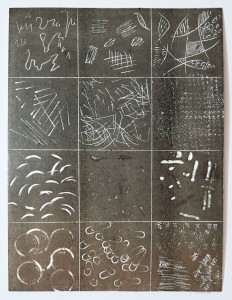 1) Pencil
2) Pencil
3) Pencil
4) Printmaking spatula
5) Printmaking spatula
6) Nailbrush
7) Tablespoon
8) Soft rubber pastel blending tool
9) Handle of the pastel tool in 8)
10) Cap of linseed oil bottle
11) Metal paper clip
12) Wire brush
Using the scratch-foam was very pleasant because it was so easily embossed and all the textures printed nicely. Making marks was very similar to using foam sheets, but it printed even better because the surface was less absorbent. I also liked that half tones appeared in my print.

Evaluation of my experiments
From all the materials, I liked the scratch-foam best because it was so easy to work on and allowed to create interesting textures with almost any tool.
I felt that I wanted to proceed towards deveoping an image idea and then decide on a printing method that would work with my chosen subject.