The collagraph plate
The collagraph was made on thick cardboard, roughly A3 size. The materials were attached with PVA glue by Guardy. I wasn’t very happy with the glue because it stayed extremely sticky even after 3 days of drying.
upper row: metal pins / Quinoa grain / Black Tea / Rice paper for spring rolls / glass noodles / yellow lentils / rolled oates
lower row: rice / burlap band / sweets foil / woodcut scraps / sand / linocut scraps / cotton thread / pieces of rubber band / flat ribbon

The prints
The plate was first inked with a brayer to produce relief prints. Then I printed the collagraph on different types of paper. The larger sheets were printed by hand, the smaller sheets with the press. All prints are A2 or a little smaller.
1) A2 white drawing paper, printed on damp paper by hand using a baren (two prints)
2) white sulfite drawing paper, printed with the press


From my earlier reading on collagraph prints, I retained the idea of making intaglio prints by wiping off the ink from a fully inked plate. I was curious whether the technique would work with my plate, so went ahead, using a little brush to ink the entire plate. To not waste so much ink, I took a first proof from the fully inked plate, then wiped the ink off as thoroughly as I could with some tarlatan.Then I took a print which was supposed to be an intaglio print, but it turned out to be a relief print, just as the others.
3) White rice paper, printed on dry paper by hand with fingers and baren
4) Arches text wove paper, then printed on damp paper with the press


Some reflections
I was a little disappointed with the prints. The first thing I did not like was the instruction to glue the materials into designated rectangle areas. I know it’s supposed to be experimental and serves to develop knowledge about how different materials print as a relief, but I’d have preferred a looser approach with a free composition on the board which would have more visual appeal when printed. With the squares, it looks rather artificial and academic to me.
The second reason for disappointment was that the collagraph didn’t work as an intaglio. I thought that by using a press, I’d be able to make it work, but I guess the materials I glued on my board were too high. Probably intaglio will work with materials not thicker than half a millimeter or so.
Experimenting with colours
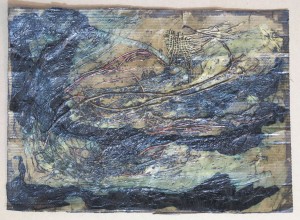 I wasn’t very curious about how the plate would print in a different colour, so decided to use another collagraph plate which I had made around 2 years ago. At the time, I did not have a press and wasn’t aware how I could successfully print by hand, so the one test print I made was with standard watersoluble ink and on dry paper, and it turned out very faint.
The plate had an interesting design created from various household materials, attached with PVA glue and then sealed with Shellac.
For this print, I wanted to use dabbers and went back to the instructions from the previous project. I made a dabber from a sponge which I cut into shape, plus some cotton buds to create a round top. This was wrapped in cloth and covered with PVC leather. I chose the PVC material because I anticipated that the Akua inks I’m using would be soaked up by cotton cloth. By contrast, the PVC leather is non-porous and I thought this would result in more ink transferred onto the plate.
For the first print, I used only brown ink. The plate was inked with a brayer first, but due to the heavy texture, not much ink was retained, and so I switched to the dabber. I fully inked the plate, with the idea that there would naturally remain lots of white space around the textures.
For the second print, I combined brown and blue ink. I started with brown for the center of the plate, then cleaned the dabber and applied blue to the outsides. The ink mixed a bit on the plate, which I expected to result in some interesting colour variations.
I printed with the press on dampened sulphite paper. Print size is between A2 and A3.
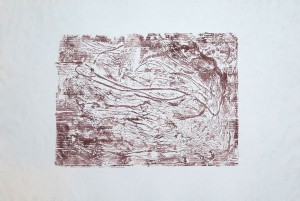

I’m finding the results somewhat more interesting, although I’m still a bit disappointed because it became clear that this plate wouldn’t work as an intaglio either. I had the idea of combining different colours using both relief and intaglio methods with the collagraph plates, but it was obvious that the plate wasn’t appropriate for that.