I discovered Suminagashi while researching traditional Japanese woodblock printing. I found it mentioned on the courses page of the ‘Center for Book Arts’ in Manhattan where I was looking up woodcutting courses by a Japanese Artist.
Suminagashi is a water-based marbling technique. The difference to other marbling techniques is that inks are put on plain water, no thickening agent is used. The ink stays on the surface because of the water’s surface tension and a hydrophobic effect between water and inks. Little drops of ink are placed on the surface with a brush and distribute themselves over the area. Interesting patterns can be created by bringing the water into soft motion, for example by wiggling with a skewer or by lightly blowing.
 I was totally fascinated when I saw this demonstrated in an instructional video. From reading around in the web, I picked up that this was supposed to work with Chinese and India ink as well. So I went ahead with a first trial using my Student Grade India ink. Well, it didn’t work, the ink was too heavy and sank to the bottom immediately, rather than creating ink swirls on the water surface. With some more trial and error I finally got some ink stay on the surface. I then placed a piece of paper, about A6 size, onto the surface, let it soak briefly, then took it out. Unfortunately, it did not hold the patterns. The result was just an irregular brown wash on the paper. I took the sheet and played around a bit with the remaining ink from my brush, watching the ink disperse on the wet paper surface. This was interesting as well, but not what I intended. I had used some leftovers of a torn sheet of Arches Text Wove paper and later learned that the cauliflowers on this image happened because of the sizing of the paper. Good to know!
So I decided to order the ‘Suminagashi Marbling Ink Set’ and give it another try. While the inks were better at staying on the surface, the result on paper (Arches text wove again) didn’t work too well either. I switched to rice paper, and this time there was some progress, and I actually got some marbling effects transferred! The only problem was that the rice paper disintegrated when it got wet, and I had trouble getting the little sheets out of the water tray. The first two pieces came out with only minor damage to the borders, but the third paper which looked so promising tore apart. How annoying!
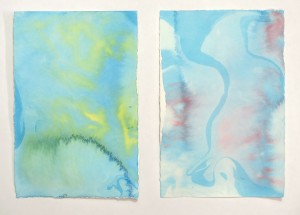
left: Arches text wove, A5: minimal marbling effect
right: Sumi-e rice paper: Marbling works better, but the paper tears when wet!
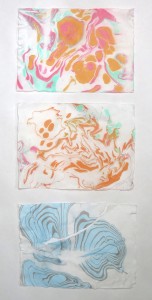
 I had been printing a collagraph on rice paper from a paper roll before. I had even soaked it and got it out of the bath tub without tearing it apart. Probably that paper was of better quality. So I made another try with that paper, took a large piece off the role, tore it into A5 pieces which would fit into the tray, and made another series. This time, it worked. The paper didn’t tear and it took on the colours off the water surface with only minimal blurr. Over the series of 8 sheets, I began to get a feel for creating patterns and tried out different methods to combine different colours. The image shows the 8 sheets in the order I made them, starting with the left column downwards, then the right column downwards.
Here are some pictures I took from the process. I worked in the bathroom and had placed a little plastic tray between the sinks. The left image shows the inks on the water surface after I had finished dropping. The right image shows how it looked after I created some water movement to make the ink wander around. This was the surface from which I made the 6th sheet (2nd column, second sheet).


Since this worked quite nicely, I wanted to try larger sheets of paper. As a tray, I used a large plastic tablet. The first attempt was a rice paper sheet almost as large as the tray, about A2 format. the second was sulphite drawing paper somewhat smaller than A3.


 With the larger size, the entire process became a bit awkward because I wasn’t able to carry the water-filled tray around. Instead placed the empty tray onto my work surface in the hall and went to the bathroom about 20 times to fill it with water glass-wise. Later I had to get the water out the same way. Next time I’ll certainly use a little bucket!
The large surface also had a diluting effect on the colours. I needed much more ink to obtain at least moderately intense colours. The inks were less intense on the sulfite paper. The colours look a bit strange, like food colouring, and the overall impression is a bit Kitsch. But overall, the entire process of making Suminagashi sheets was great fun. It’s almost meditational experience to sit quiet in front of the water, dropping ink and watching what happens on the water surface.
Suminagashi is quite similar to printing, because you take an impression of an inked surface! I think it’s quite cool, overall. I still need to find a better technique for getting the large sheets into the water without creating air bubbles, because these leed to white spots, as you can see in the middle of the large sheet. I also need a better method to get the large sheets out of the water, reducing a bit of smear from dark ink running over the sheet. Maybe the sheet must soak a little longer or a little shorter, I’ll have to experiment.
Possible impact
Besides having fun with Suminagashi, I was also reflecting how this might impact my printmaking. One aspect is certainly the different mindset that comes along with the technique. It’s exciting to observe the developing patterns on the water surface and to see how they come out on the paper. I’m not sure if it’s possible to create figurative images, nor if I would I want to. But creating interesting abstract patterns is nevertheless worthwhile for me.
Suminagashi might be combined with other printmaking techniques, using the marbled patterns as elements in a figurative composition. Maybe it’s possible to mask areas of the paper, so it gets only partially marbled. Or use cut-outs of Suminagashi sheets in a collage that also includes printed elements.
The broader impact might be seen in context of my recent research into Japanese woodcutting (Mokuhanga technique) and interest in finding out more about Japanese printmaking techniques. I don’t know where this might lead to but for now I think it’s good that I’m beginning to be more experimental and open-minded in my practice.
References
Suminagashi class at Center for Book Art, Manhattan http://centerforbookarts.org/event/suminagashi/
Blick instructional video https://www.youtube.com/watch?x-yt-cl=84359240&v=J410yQ7PI1E&x-yt-ts=1421782837
Suminagashi ink set, avaiable from Amazon http://www.amazon.com/Innovation-Marbling-Kit-Japanese-Suminagashi/dp/B003W2PX8M/ref=pd_sim_ac_3?ie=UTF8&refRID=1CSM6T2PGEN723DHQADG
Suminagashi website with basic instructions, recommending Kodak Photo-Flo (as “surfectant” to add to the ink) http://suminagashi.com/